Friday, September 28, 2012

pink buffalo.... check

I had an itch.
Kind of a whim.

And if I were going to act upon it,  I needed to whip up something in an hour or less.  The challenge was on!
When I saw the cover of the first book I chose from my cabinet, I said, "That's it!"
I'd seen that purse a million times and had wanted to make it but had just not committed.  Well, today was the day.  All I needed to do first, was make a size modification.  Done.

 
Then I gathered these supplies...


  And then these finishing items...

 
And lickity split, they became this...

Perfect for a three year old's treasures, don't you think?

Because it's for a little girl, I decided it needed a little something fun.  So I tied on various sized and colored ribbons and sewed a little bell (from a button card) to the knot.
I love how it tinkles so very sweetly as you walk with it


pajama party

Yesterday, I sewed pajamas for a little one year old darling.  This was another "meaning to" project that had been lingering on my list for about three months. After sewing so many quilts lately using a 1/4" machine foot and seam allowance, at first it felt awkward sewing with a regular width foot and using a wasteful 5/8" seam allowance! But it was fun switching it up a little.  I do love sewing baby girl clothes.


 The fabric was one I had on hand and had purchased from JoAnn's.  I love the vintage-like Asian toile in that yummy deep sky blue.  The 100% cotton bias tape I purchased from Superbuzzy.  It was a little pricey, but definitely just what I wanted.

I Spy moment.... Do you see that pin that I left in the back?

I used two different patterns for the top and bottom. I liked the tucks on the bottom of the Vogue pattern pants instead of the cuffs on the bottom of the Simplicity ones (they seemed bulky).  Both patterns are currently sold in stores.

 I made the inside of the bottom band contrasting instead of the front as the pattern suggested.

See how sweet the tucks are?

And I loved the pattern idea of top stitching a portion of the tie.

♥♥♥

Info for more experienced sewers:

 This contrast edging on the bottom of the pajama top is not part of the pattern design.  It's a little something I came up with during construction.  The pattern instructions have you sew a facing to the bottom edge of the pajama top which will then be turned up and top stitched at the seam line where the bottom band meets the body (photo five pictures above).  Instead of pressing under the edge of the bottom facing with a 5/8" seam allowance, I only pressed a 1/4" seam.  This meant that when I turned up the facing band (brown print fabric) to cover the seam line, it left a little fabric showing at the bottom edge because the facing piece was a little too long.  Finally, I top stitched between the toile and the brown facing fabric. [If your brain is mush trying to visualize all of this, I can post step by step photos!]


Wednesday, September 26, 2012

double the fun

Because I had so much fun making yesterday's project, during lunchtime today I simply had to do it again!  And because the first set was a little girlie looking, I decided to take out two people from the original group, add them to today's set, and create specifically a boy box and girl box.


 Fortunately, I have enough supplies to make yet another set.  I love paper and wood! 

Previous post on this quilt

Tuesday, September 25, 2012

come and play!

My darling 20 month old grandson, Evan, is coming (with his parents) to visit in just a few days!  Because he loves to sort and line things in a row, it motivated me to put together a toy that I had been intending to make for quite a while. The supplies are few and quite inexpensive - the wood products only totaled $5 and the others I had on hand.


The supplies are easily found at most craft stores: an unfinished wooden card box, eight 2.5" people, small print origami paper, craft paper, scissors, and Mod Podge (I used satin).....oops!  and a sponge brush.


First, I made a template for the "clothes", 1" x scant 3", and cut out the rectangles from the origami paper.  I put Mod Podge only on the backside of the paper which meant I had to be careful when I started wrapping because the paper couldn't "scoot" like it can when you put the adhesive on both the wood and the paper.  Origami paper is thin, so it wrapped quite easily and laid flat with no fuss.

Next I decorated the outside of the box by simply using Mod Podge to adhere the base paper and the decorative paper.  The "g, h, i" strip is simply cut from a scrapbooking alphabet paper sheet I had and Mod Podged to the base paper.

Inside I used thin craft paper and a little decorative whale cut from the same alphabet sheet that I used for the front.

Here are the little cuties nestled inside.  I am going to look for a non-toxic sealer to paint over the paper on the people since they just might end up in someone's mouth!  Now all I need to do is find a car that they'll fit in...since that is the toy of choice for a grandson who is all b-o-y!

Monday, September 24, 2012

better binding

I thought I'd share a little binding trick that I thought of recently.  It is meant for those who do not join quilt binding seams on the bias. Now, I recognize that this technique might be widely known to experienced quilters .... which, of course, makes me a quilting plagiarist!.  If I qualify, my deepest apologies.  I've been quilting less than a year and have SO MUCH yet to learn.  But enough about me...


Sew together your cut fabric strips for binding.  After you've pressed the long, continuous strip in half, snip into the seam allowances at the fold, a few threads from the stitching.

Press sections in opposite directions.

Refold, making sure the two sections nest together and lie flat.

Press to set the seam.

Roll it up and off you go!

If you'd like to know the fabric I used, it's from Amy Butler's Gypsy Caravan line.  It was to be used on a quilt I made for my mother (which I can't blog about since I haven't given it to her yet!), but in the end I chose something else.  So now this strip is all pressed and ready for ???

Saturday, September 22, 2012

three words....

I want this.

It's a group of fabric cuts sold as a complimentary set and designed by Bari J.
Don't you think they would be lovely sewn into anything?
Two words...
I do.

feeling so stitchy

Yesterday I was at Disneyland with two of my children.  Oh, those charming tea cups!  Oh, those precious small world mannequins!  Being there amongst all that adorableness reminded me of two Gera! patterns which I had at home that featured Disneyesque international children. Project time!
(see previous post opening)

Aren't these little cuties smile inducing?  Really.  How could I say no?
I've decided that I will stitch the first row only, frame it, and hang it in my new sewing room.  That's right.  I said sewing room! OK, true confessions:  I don't have a sewing room quite yet.  But I will have one around the first of the new year. I've already started buying furniture for it and collecting organizational ideas from Pinterest. Let's just say the word "anxious" is an understatement!!

 Thank goodness I just picked up my new eyeglasses because I'm going to need the best near vision possible to stitch on 32-count linen.  I haven't cross stitched in years and suspect it will be a little more challenging now than it was when I stitched with "young eyes" (as my dad called them then). A friend of mine recently told me that she holds her fabric up to the sun to see the holes for stitches. Let's hope I can avoid that terrifying technique!

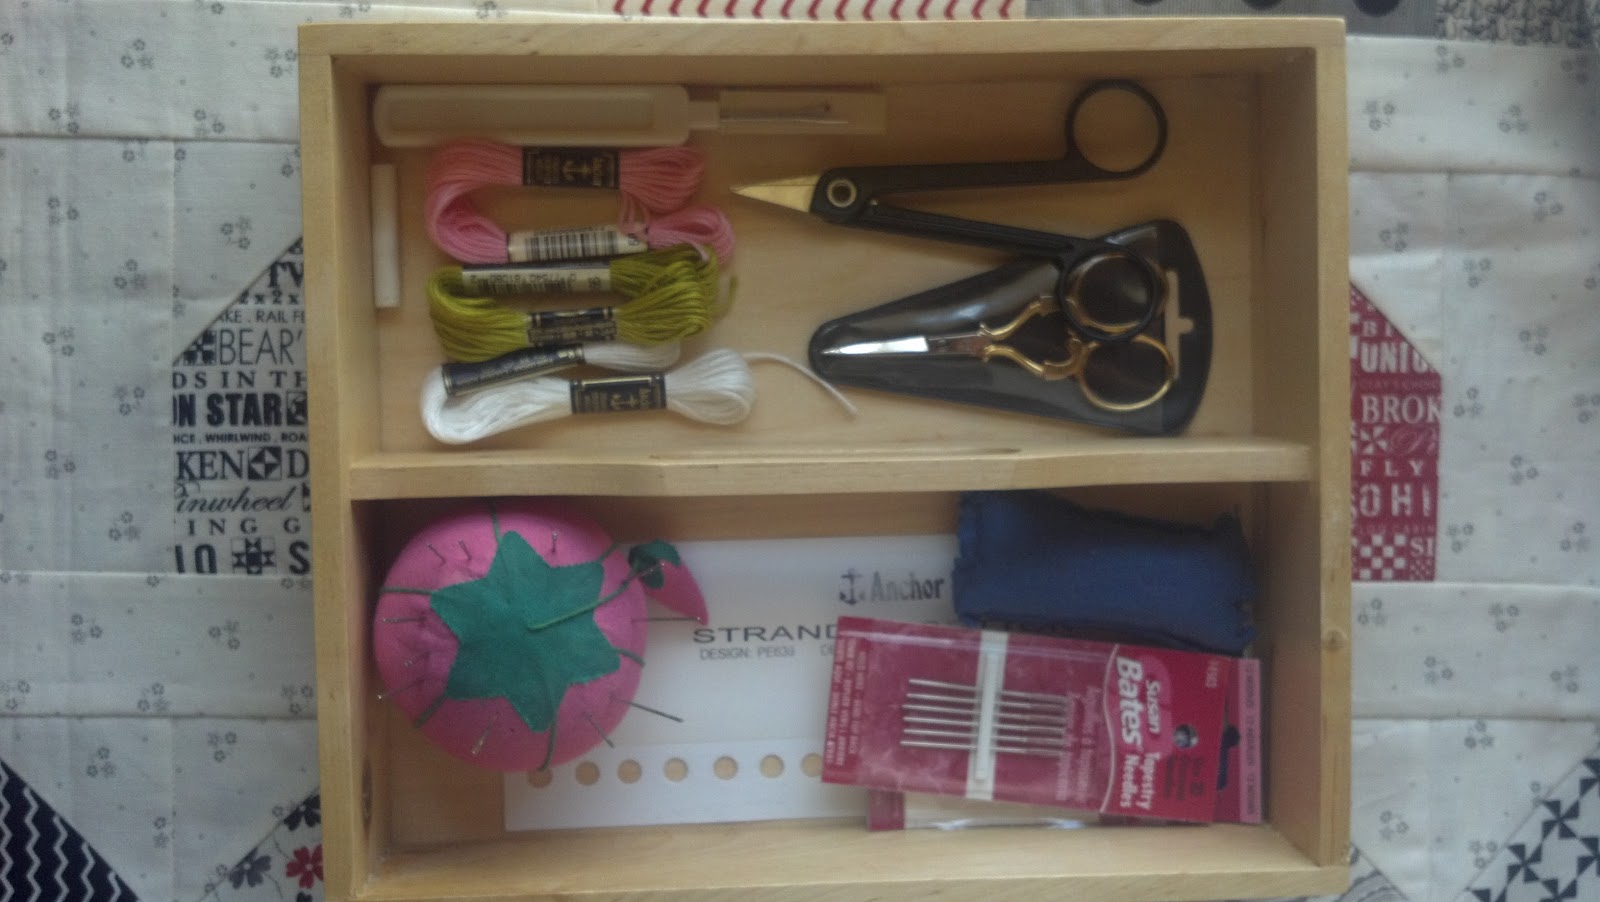
 Here is my little IKEA sewing box....after I tidied it up for this picture.  If I'd have shown you what it looked like before, I would have put a blight on my family name!  The black handled scissors inside were a gift from my grandmother years ago.  She owned a pair, loved them, and bought a pair for me. I really can't imagine doing needlework without them.  One of the blades is hooked so that it lifts the stitches before you cut them - which is quite smart and reassuring.

 Now these yummy containers of wound thread were a true find and steal.  I bought them at a yard sale too many years ago to remember where or when, but I do remember doing a happy dance when I spied them and saw the price tag.  All these years later, I still love just looking inside at all the inspiring colors!

 The pattern I'm using for this project, is one that I bought from a company out of LA, superbuzzy, which sells imported Japanese fabric/notions. I love to peruse their website and dream of excess time and $$.

Finally, I wanted to show a picture of a treasure - a metal embroidery hoop that belonged to my mother. The fact that she held it in her hands to stitch her own projects warms my heart and makes me happy that I'm living her creative example.

With this extensive blog post, I'm committed to starting and finishing this project. I want to have it completed by January when I get that lovely new room....all to myself.

Monday, September 17, 2012

hit it!


♪  I said you wanna be startin' somethin'
You got to be startin' somethin' ♫
♫ I said you wanna be startin' somethin'
You got to be startin' somethin' ♪ ....

 Sometimes I have to go off script and start a project that I did not have preplanned.  So today during lunch hour, I cut up a few pieces of fabric and stitched them together into simple pinwheel blocks.  We'll see how it progresses, but I do like what I have so far......albeit only three untrimmed blocks into it! I also cut some solid blocks of white dimple dot minky.  Hmmmm.....

Saturday, September 8, 2012

Yes, Joann Fabrics, it's true that I needed to give you some of my money today.
All but 30% of it, that is.
So we'll just call that a win-win, ok?  


pass the butter, please

I'm not sure about this attempt. What I had envisioned in my mind is not what is being produced at my sewing machine. I think it could be what's seeming to be 1970's color combinations ... in all their garish display.
I surely didn't mean to do that.
But now I'm halfway done and too far along in this venture to make changes.
Maybe it will be a tablecloth.
Maybe not.
We'll see.


Thursday, September 6, 2012

Sugar Hill fabrics


While at the library a few months ago, I thumbed through a copy of McCall's Quick Quilts (April/May 2012).  I found a lovely quilt pattern inside called "Cottage Stars" and asked the librarian if I could check out the magazine.  Well, I couldn't (and now I know).... BUT she said I could copy pages out of the magazine.  REALLY??


Of course, the library copier only copied in black and white, but it was not a problem since I could look up the quilt in color online (link).  Using "Cottage Stars" as inspiration, I took a pack of 6" squares of Sugar Hill fabrics and a little red floral and pale pink fabric to make this simple baby quilt.


The wind did not cooperate. Plus I don't have a lush green backyard to use as a backdrop for my photos. And frustratingly, I only have a cell phone camera.
But I do own lots of lovely fabric.  And I get to sew on a buttery sewing machine.
So life is good 

London topper


I enjoyed the Olympics so much this year, that I decided I must make a little something in honor of the event. Fortunately, I found all but the Union Jack fabric at one stop, Rosie's in San Diego.


It's kind of a funky quilt design. And the original pattern didn't call for an outside border, so it looks a little tacked on.  But the quilt whipped up in an evening and made me smile when I was finished.  I think I'm going to have it quilted with overlapping circles (to somewhat mimic the Olympic rings) and bind it in red. The backing fabric is mini houndstooth in black... why, of course