Showing posts with label toys. Show all posts

Wednesday, June 26, 2013

car cozy

As you might know, I have a grandson.  As you might not know, this grandson LOVES anything with wheels:  cars, trucks, trailers, trains, motorcycles, wheelbarrows (ok, maybe not that one).  But cars are his #1 go-to toy and have been, I'm sure, for as long as he can remember!   So when I saw the pattern for a car carrier in the Winter 2012 Simple Quilts & Sewing magazine, I knew who needed it.


Last night during quilting class, I discovered some fabrics that inspired me to get sewing.  They are from a Riley Blake line named Boy Crazy.  The fabrics are so cute that I bought some others from the line to make a special pillowcase for Grandma's house (pics to come).
I stitched up the car project in no time this morning and will whip up the pillowcase this afternoon.  Gotta love the easy ones!


The only changes I made to the pattern were to add rick rack to the pocket dividers and to top stitch the yellow road lines.  Oh yes, I didn't use black flannel for the road as the pattern suggested.  I thought it would collect far too much fuzz and crumbs from the floor.
(I just noticed the whisker thread at the bottom that needs snipping! oopsie)


I bought the tractor and jeep from Target, and the green/silver car we had leftover from my boys.  I do wish the tractor had a trailer, but Evan is quite skilled at taping and I'm sure will finagle a way to have it "haul" something.

See what I mean??


The cozy folds in half and rolls up quite nicely, even with the bulky cars inside. After I took this photo, I angled the ribbon ends and applied Dritz Fray Check - a sewing staple!  

Happy vroom-vrooming to Grandma's little darling!


Saturday, February 2, 2013

modge and me

A while back I made a memory game with small wooden discs blogged here.

This is a set I made last Saturday using larger 1.5" discs.  Take those and some printed paper, scissors, Modge Podge, a sponge brush, and about an hour of your day and you, too, can produce this cute little toy.  Actually, it would take less time if you own one of those snazzy paper cutting punch tools such that you don't have to cut out each circle by hand!

The adorable container was something I found for only $2.99 at Michael's craft store.  It has a hinged lid and a clever peek-a-boo window.  It's "old-time lunchbox meets take-out" and more nice polish to the set than the organza bag I used in the mini one.  Plus I think any child would have a lot of fun carrying around a metal box (I would!).

I've played this game with my 12 year old and my 19 year old, so I'm thinkin' it would be a great gift for just about anyone!


introducing...

A sweet little publication arrived last week and I thought my little doll would be the perfect someone to introduce it to you!  This booklet from Moda is filled with darling projects made from mini charm packs (2.5" squares).  And who could resist that delicious cover?  Certainly not me!


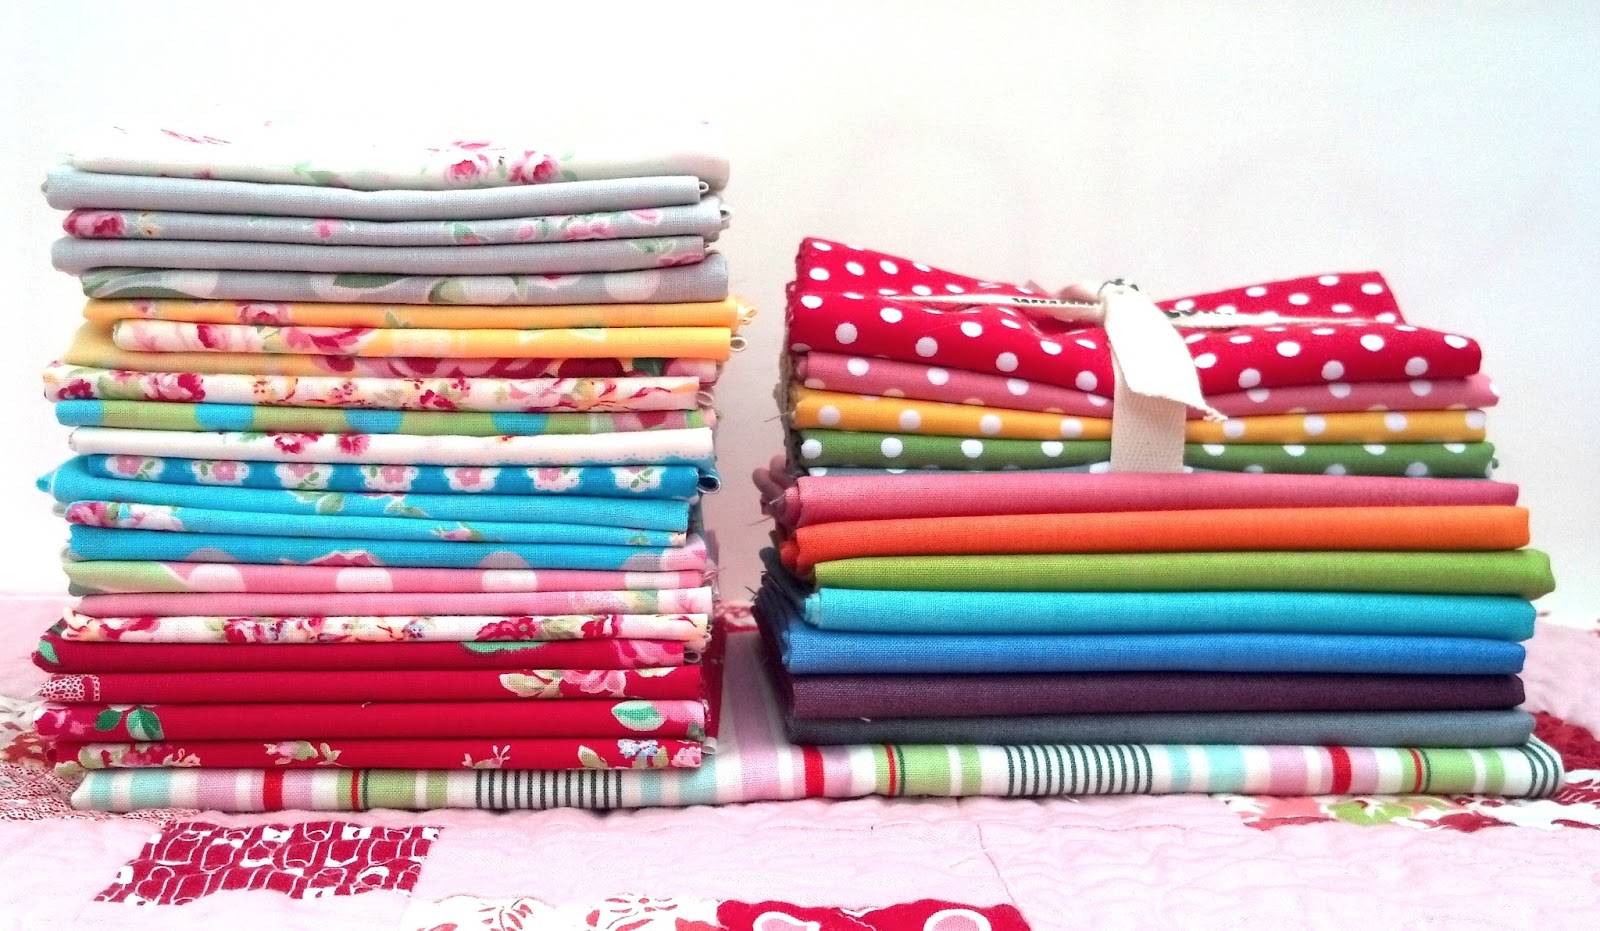
And here is a stack of happiness that I am going to use to make either the great granny squares quilt or the sugar block club quilt (see buttons near the top of right sidebar).

These fabrics are so pretty I'm going to have a hard time cutting into them!  The stack on the left is Lecien Flower Sugar and I've been wanting it for oh, so long!  The Calico Cottage Quilt Shop has it on sale, and I bought one fat quarter of each print they carry.  The bundled stack on the right (top) is from my local quilt shop.  The label reads "Everything Nice".  The bottom cuts are the ombre solids from the Simply Color line and purchased from an Etsy seller.  The stripe fabric is from Heather Bailey's Nicey Jane line, also purchased online. Yes, I can find pretty fabric just about anywhere!


Tuesday, October 23, 2012

It's a match!

I've had my eye on this sewing project for quite a while and last night finally got to stitching it. Truth be told, I needed something to work on to distract me while I watched/listened to the presidential debates.  They soooo stress me out.  Because I want my guy to do well, I'm on pins and needles until it's over.


This project is from The Purl Bee and is titled Emily's Memory Game.
Since the fabric squares are 2 1/2", it is a perfect project for those who have leftover
... quilting word alert ...
jelly rolls strips.


I only made half of the recommended squares because I didn't have enough of the white wool on hand to make more.  Fortunately, today I found an etsy seller who can enhance my depleted supply.


One change I made to the pattern was to use iron-on adhesive between the top and bottom squares so that they wouldn't try to slide around while sewing them together.  Another change was to zigzag through all of the layers instead of just the top two. And finally, an obvious change was that I used blue as the backing instead of white.  Not sure I like the stitches showing on the blue; but I knew if I'd used white as the pattern suggested, the squares wouldn't be munchkin-hand friendly.


I had in my crafting stash the perfect box to store the game in (probably either from Hobby Lobby or Michael's).  See, Honey. I do eventually put this stuff to use!
I simply washed the box in blue acrylic paint and sealed it with Mod Podge.  The decorative paper was modged to the bottom so that it was less likely to be peeled up by those little prying hands that we all know will attempt to get to that bee!


I think I'm drawn to memory games (see this post) because when I was young, my mother would play Concentration with me over and over and over again. We'd take turns laying out the 52 playing cards on the living room floor and chat while we tried to memorize the location of the face-down cards.  I remember winning a lot of those matches.  Having been a mother to young children myself, I now know why.  *wink*

Wednesday, September 26, 2012

double the fun

Because I had so much fun making yesterday's project, during lunchtime today I simply had to do it again!  And because the first set was a little girlie looking, I decided to take out two people from the original group, add them to today's set, and create specifically a boy box and girl box.


 Fortunately, I have enough supplies to make yet another set.  I love paper and wood! 

Previous post on this quilt

Tuesday, September 25, 2012

come and play!

My darling 20 month old grandson, Evan, is coming (with his parents) to visit in just a few days!  Because he loves to sort and line things in a row, it motivated me to put together a toy that I had been intending to make for quite a while. The supplies are few and quite inexpensive - the wood products only totaled $5 and the others I had on hand.


The supplies are easily found at most craft stores: an unfinished wooden card box, eight 2.5" people, small print origami paper, craft paper, scissors, and Mod Podge (I used satin).....oops!  and a sponge brush.


First, I made a template for the "clothes", 1" x scant 3", and cut out the rectangles from the origami paper.  I put Mod Podge only on the backside of the paper which meant I had to be careful when I started wrapping because the paper couldn't "scoot" like it can when you put the adhesive on both the wood and the paper.  Origami paper is thin, so it wrapped quite easily and laid flat with no fuss.

Next I decorated the outside of the box by simply using Mod Podge to adhere the base paper and the decorative paper.  The "g, h, i" strip is simply cut from a scrapbooking alphabet paper sheet I had and Mod Podged to the base paper.

Inside I used thin craft paper and a little decorative whale cut from the same alphabet sheet that I used for the front.

Here are the little cuties nestled inside.  I am going to look for a non-toxic sealer to paint over the paper on the people since they just might end up in someone's mouth!  Now all I need to do is find a car that they'll fit in...since that is the toy of choice for a grandson who is all b-o-y!

Thursday, February 16, 2012

fleece bean bags


So if your cute little 14 month old grandson needs some bean bags, you quickly get to work!  Today I made five 5 inch bean bags in 5 minutes.  OK, it wasn't 5 minutes, but it felt like 5 minutes.  I took my 5" plastic quilting template and cut out 10 squares of fleece with a rotary cutter.  Next I stitched around the outside edges with a 3/8" seam, leaving a small opening.  Then using a funnel, I filled the bags 3/4th's full with some Israeli couscous (from Fresh & Easy).  After stitching the opening closed, I pinked the edges.  Finally I walked around the house calling "heads up" to my kids while tossing a bean bag at them.  They worked perfectly! *wink*

Friday, September 30, 2011

Dolly Day


 I had a couple of dolls cut out and decided today was a good day to get sewing! The hair is a wool/poly blend felt, top stitched in a contrasting thread color; and the bodies are flannel - except for one. The cheeks are blushed on with a small,firm round brush. The eyes are black paint set on with a stylus, and the mouth is drawn on with a permanent marker. Don't they look like best friends?! Pattern linked here.

And Here's a doll I made using the same pattern (my daughter gave this to one of her piano students). The face is more distinct and I think I like that better.  Do you?

Friday, July 8, 2011

Mr. Bear for Mr. Cute!


Here is a bear I knitted for my grandson, Evan. The pattern is from the book Simple Knits for Cherished Babies by Erika Knight. The body is knit in four pieces and the head in three. Wish I had saved a label from this yarn. All I remember is that it's chenille and quite yummy! P.S. The baby is much cuter than the bear!!

Friday, July 1, 2011

Memory Game


This matching/memory game was such an easy project! I simply traced, cut out, and covered 1" wooden discs with origami paper using Mod Podge. When they were dry, I stored them in a little mesh bag which had held fortune cookies from Panda Express (reduce, reuse, recycle!). I have more circle papers cut but ran out of wooden discs. It's funny what you can wake up in the morning wanting to create! ♥


Tuesday, June 21, 2011

Easy Baby Toy


From the book "Pretty Little Presents". I added some ribbon and zig-zagged across the ends of the petals to give it more dimension. The toy is made by sewing a casing at the squared end of the petals and joining them all with a piece of elastic. I chose the contrasting colors of red, white, and black so that the toy was appealing to a young baby.
PS: There are little bells inside the stuffing which makes for a muted jingle sound. Sweet.

Thursday, May 19, 2011

Stuffed Bear


My first attempt at giving this 1970's bear pattern a modern twist. The face turned out too dark, so I will need to make another run to the quilting store for a lighter wool felt. I put a few poly pellets in the bottom of the legs to give him some weight. Next time, I will embroider something on the pocket - maybe an initial?

Thursday, May 5, 2011


I had seen some adorable little balls made from quilting fabrics and decided to try a larger version. What an easy project! Inside I placed a large jingle bell which has a wonderful mellow ring, and at the ends are sewn felt buttons to hide the messy seam ends. I used the free pattern for small balls at Grand Revival and simply enlarged it. The fabrics on the first ball are canvas (Japanese fabric), satin, and flannel. The second ball is made from cotton chenille. Each has a fun texture that baby would love!